Posts

Showing posts from June, 2020

Solving the exhaust puzzle

Image
The pipe fits well and test fitted right in. The old flange was ready to go. Those images are all the drivers side which worked out without any trouble. Now the passenger side just isn't right. The middle hanger is different looks considerably shorter and it just doesn't sit right. If the tip is tucked into the bumper relief, the pipe hits the gas tank the upper control arm and was less then a half inch from the drive shaft. I loosened it and ratchet strapped it over the rear axel and unhooked it from the rear hanger. I also used the upper middle hanger hole lowering the back. My plan is finish the welds loosly connect the mid pipe and drop both sides from the back hangers. Then adjust the h-pipe upwards until am happy. I may lower the tip 2 inches from the bumper of it gets the whole system to line up.   

Exhaust back together for a minute

Image
Exhaust finished but its not really.  Actually it all worked well except when I knocked the other mid pipe flange lose to spin and match the angle of the other side. I of course find a crack under the flange. You see it just inside the flange behind the nut. I order the 2nd flange replacement and will be able to install under the car. Not looking forward to welding while laying down under the car, but I will get it done.

Wiring Rabbit hole wasn't to deep

Image
So I finished the wiring of the back of the car and put it all back together. After I removed the interior sail panel and fixed the connections that were suspect. I wrapped the harrness from the back seat through to the marker light on the passenger side. Then hung the harness back on the oe clips most of which were still in thier holes. I still have to wrap the wires that cross the center of the floor pan and clip them back into place. The new fan and old fan controller need some attention. 

Interior wiring

Image
I am just going to throw the pics up because it's late. The wires behind the sail panel are honestly a little scary. I am slowly solving each area.

Solving the exhaust problem

Image
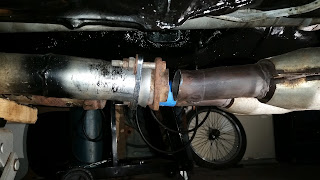
So this is the problem or at least some of it. The passenger side pipe is about 1 inch short and the drivers side is 3.5 inches short. So I spent 2 grueling hours cutting the flanges off. Why so long? Grinder only gets access to about 20% of the pipe because I cut it 1 inch from there flange. I cut it there because I need as much straight pipe left to slide and clamp the new pieces to. Basically more pipe is more adjustability. So that means hack saw because my reciprocating saw need a new blade lock cause it only stays for 3 or 4 seconds and then let's go of the blade. Basically I tapped my hack saw with a dead blow for half the time and went at it hard the other half. Now the other problem is this is an sn95 setup. The tail pipes don't kick out as far after the axel and hit the gas tank and the upper control arms. Sliding the mid pipe back a half an inch solves the control arm issue so I will work from there.  To get a straight cut I through a clamp on the tube and then wrap

Exhaust system

Image
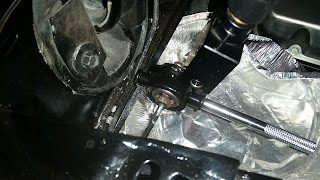
So I started putting the exhaust back on. I fought the oe catted h-pipe for a good 3 hours. I closed up the egr pipe because I don't have any of the other pieces. I may eventually revive it. I bent the transmission bracket which a wrench because it was wonky on the drivers side and finally just put it on my belly and knees and muscled it into place.  Then I see the mid pipes are custom cut to the bbk h-pipe. The oe pipe has about a 1 inch difference between the short and long tubes. The bbk is about 3.5 between the short and long tubes. After a think, I decide I will extend the oe h-pipe this way the bbk h-pipe still fits. I ordered 2x 2.25 exhaust extensions from amazon and they will be here Friday. I can just cut the flanges off the oe pipe and butt weld it out from under the car and slit and clamp the pipe over the oe tube.  The I installed the O2 sensors just to button things up.  I still have to save the speedometer cable from getting melted by the header.

Finishing up the brakes

Image
So I dug into the brakes. First step examine the porportioning valve and flare fittings. They looked good but it was clear the outside connection was not bottoming out. I grabbed my cheap Chinese tap and die and ran the right die over the threads by hand. No more leaks. Then I proceeded to run half a quart of brake fluid through the rear passenger side and the threads on the bleeder just keep leaking. I tried peddle pressential with a board and the hose dipped in a fluid source. I tried a vaccum bleeder and the bubbles just kept coming.  I considered ordering new bleeder screws but it's just a pain to wait. Finally I googled leaky bleeder valve. While I found many people complaining about after they were closed mine was a problem when open. Then I came across the revolutionary advice "slather the valve and wrench head in heavy grease and slid it down over the threads after you open the valve" worked like a charm!

Driveshaft and ground strap

Image
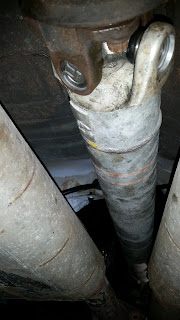
I finished tightening down the drive shaft bolts. I'd like to torque them to spec but you can't fit the head of a ratchet in behind the bolt head. So a wrench and breaker bar should do. I put a pipe between the lugs so the axel wouldn't spin. Working alone it's faster then pulling the ebrake or putting it in 5th because you don't have get up off the creeper.  I scraped the left over grease from the bottom of the diff. I need to take a wire brush and some brake clean to it too. It was all there before I redid the cover seal and there is no leaks from the rtv. A small task but very important. Reattach the ground strap to the back of the head. Honestly I will replace it later cause it's pretty grody. A little if a knuckle buster to get to and the main vacuum line and bap sensor had to move while I did it.

Lots of brake work

Image
Got into the front brakes and it was certainly easier then the back. Instead of hanging the caliper by a bungee I stuck it on a bucket to work on it. New drilled and slotted rotors. The front brakes depressed easy enough to use a channel lock but I used the tool anyway. Front is all back together. The locating pin didn't want to seat and one of the pad clips kept popping off. I peened the stud with a hammer and screw driver so hopefully that will keep it on. Just a defective pad. For the rear I used the new slid pin dust covers that looked correct online cause no one just sells the boots. I greased the new slide pins with brake grease. The dust boots were a little tight on the bracket. I still only needed my fingers to install them so they should be fine. This is the caliper piston after the 3rd time. I kept getting the dust boot wrong. Your supposed the install the flat seal and then the dust boot is put on the end of the piston and installed before you seat the caliper and use th

Thank you autoparts santa clause and more fan shroud

Image
Ain't it great when autoparts Santa Clause comes. I got most of my brake parts so I can put the drivers side back together and start cleaning and rebuilding the passenger side caliper. Still to come are new front rotors and slide pin boots. The rotors I have were for a 94 -to 03 gt and the cobra rotors went 2 inches bigger in 94 when the calipers went 2 piston. Into the fan shroud. I used a half inch steel plate with a baby blanket over it and hammered about the edges with the non marring side of the rubber hammer. It firmed up the oil canning that was happening and tightened up the folds. It's better then I thought it would look. I'll drill and pop rivet the corners and then plan out the fan cuts. I'd love to do a flange around the fans but then I get into mount it washers and all that jazz. I have some rubber edge guard I will glue on the sharp edge facing the rad.  I have quite a bit of stainless scraps I will make a serious set of brackets. Just have to decide how t

Driveshaft back together

Image
That ancient tool has made it pretty easy to get this done. I thought it would be more difficult. Now I just need a grease gun and I have to do the rear control arms too.

Fan shroud project

Image
So I started by measuring the area of the radiator I wanted to cover and made a card board outline, I added an inch and a half incase I need to add 1 inch box tube support inside the shroud. The ends will be folder drilled and pop riveted. I did most of the folding and the edges could use a little beating to sharpen them up but I am happy. I am going to finish it and then decide if it needs an inner structure. I cut the circles out to get the rough lines drawn on the stainless. I will probably do the radius technique again.

Motor done

Image
I finished cleaning the gasket surfaces and vaccumed the ports. I hooked up the throttle and the wires and hoses. Added a few claps to the loose hoses.  This week the new fans come so I can fab up a stainless steel shroud and hook up the fan controller and relay. I still have to make a new ground post for the ecu and msd box and reinstall the main block ground strap.

Brake battle lost

Image
So the first slide pin I got out. The second not so much. It bent while I was working it in the vise and it snapped where the threads end. I may still try to work it out to keep the braket for a spare. Also failed at knocking the broke stud out of the axel. I had success using a pry bar in the vise. So I ordered a new one for $19 from rockauto with new pins a new caliper piston and seal kit. I am hoping to rebuild the passenger side caliper and not have to replace it. For the life of me I could not get the right slide pin boots. The ones on there 2 were ok and 2 were just wrong and those were all I was seeing on the part sites. I ended up ordering these random ones from o Reillys because they look roughly like the good ones.  I can't go further with the brakes because you need it back together to bleed it. I'll get the driveshaft u joint monday and I can put the drive shaft and h-pipe on. Tonight I will put the upper intake back on and look at the interior wiring. I need to do

Brakes

Image
I decided today was a good day to start brakes. The story before I start was I knew the back was in bad shape. The front are passable. There was 1 slid pin stuck on each side. No grease at all. All the bolts came out without issue. To get the slide pins out the first one I used heat and a pipe wrench. Started with just a degree or 2 of wiggle and worked it until I had about a half turn by hand. I ended up using a pry bar on the bracket and the second one went straight to a quarter turn. As you can see the piston is done and needs replacement. It's even missing the boot. The passenger side rotor took 2 rounds of pb blaster and a 20 min beating with a bfh.  So 4 new slide pins and boots, 1 brake piston and a seal kit and I can finish the rear brakes.